Want to support pollinators? Plant pollinator habitat!
(Updated: April 10, 2026, 4:20 p.m.)
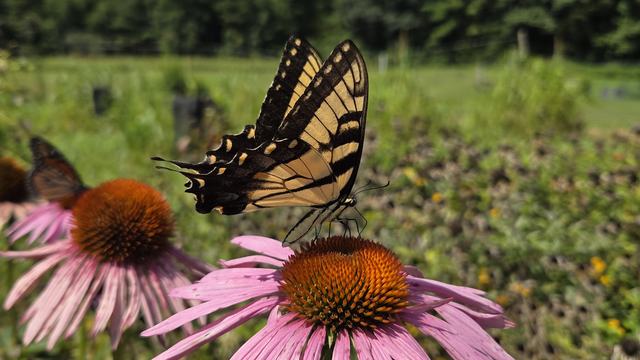
Pollinators are an integral part of ecosystem functioning by providing pollination to both wild plants and agricultural crops. In recent years, concerns about pollinator population declines have increased. There are many drivers causing these losses, but one driver that can be readily addressed is habitat loss. By establishing or rehabilitating areas with flowering plants, we can see immediate benefits to local beneficial insect communities, especially with wild bees.
Because widespread benefits to planting flowering plants have been documented, this practice has become popular, worldwide. However, many people may feel intimidated about how to get started. How do you appropriately set up this planting? What plant species are best to use? Do I need to perform certain maintenance?
To answer these questions we brought together a team from NC State University, NC Cooperative Extension, and the NC Botanical Garden. This collaborative team was awarded a two-year grant from the US Department of Agriculture's Sustainable Agriculture Research and Education (SARE) program (award no. 2023-38640-39572, awarded to A. Cruz) to study pollinator and beneficial insect habitat on farms. Drawing on lessons learned from this project, the team developed practical guidance and recommendations for getting started, which are detailed below. Alternatively, you can download this guide that the team developed: A Guide to Creating Diverse Habitats for Pollinators and Other Beneficial Insects
*Please note that the information included in the PDF and this webpage has not yet gone through final review. While we do not expect the content to significantly change, there will be updates. We will update this page as appropriate.*
Introduction
Pollinators are an integral part of ecosystems, providing pollination to both wild plants and agricultural crops. While there are many species that contribute to pollination, bees are considered the most efficient pollinators. In North Carolina, there are at least 564 different bee species. These species have diverse characteristics and can differ in their size, activity period, foraging behavior, nesting habits, and nutritional needs. In recent years, concerns about pollinator population declines have increased. There are many drivers causing these losses, but one driver that can be readily addressed is habitat loss. By establishing or rehabilitating areas with flowering plants, we can see immediate benefits to the local bee community. This habitat also supports other beneficial insects, such as predators and natural enemies of plant pests. While planting flowering habitat has become a common practice, we know that it can be intimidating to get started. This document is designed to help with that! While we designed this document with a focus on small farms, these practices can be implemented in many other land use types. However, we recognize that there are many ways to do this and you may have preferences outside of this document. That is okay. We view this habitat as a living project that will change through time and depending on a person’s personal preferences. Feel free to explore and test out new things. But if you do not know where to start and need help getting some plants in the ground, we developed the following steps for you!
Step 1: Site Selection
When deciding where to establish your habitat, take into consideration your own goals and the unique features of your land. Features such as drainage, sun exposure, shade, slope, soil type, and proximity to crops will all affect your decisions. Since this habitat uses perennial plant species, it should be considered a semi-permanent addition to your land.
We recommend selecting an area to install habitat that is near where you want pollination, but is out of the way, such as in a field margin or by a woodline. If there is an area that is unsuitable for farming or other purposes, consider using it for this habitat! However, if it is your preference, you can install the habitat in a highly used area or in between crop fields. Either way, typically the sunnier the location the better!
Step 2: Plant Selection
Once you have an idea of where your habitat will be installed, you can begin making more informed plant selection decisions. There are many pollinator-friendly plants to choose from so when making your selections consider:
Selecting a diverse mix of plant species to support a diverse mix of pollinators: this includes different bloom colors, shapes, and sizes.
Selecting plants that bloom across the seasons: it is important to have at least a few species blooming each month from March - November when possible.
Selecting plants that are adapted to your area and grow well together: consider a plant species’ light tolerance, drought and/or moisture tolerance, growth speed, propensity to spread, and height compared to species that will be planted nearby.
Selecting plants that interact well with other wildlife: are there other insects, such as predatory insects, that can be supported with the habitat as well? Do you need to worry about deer pressure or other herbivory?
This step can be overwhelming so we have included a plant species list that you can use in Table 1. When making this list we selected perennial plants that are known to support pollinators and other beneficial insects, bloom at different times of the year, and have different bloom colors, shapes, and sizes. The species we included are native, or naturalized, to the southeastern U.S. There are many benefits to using native plant species including drought tolerance, better establishment, and appropriate resources for wildlife. However, we recognize there are many non-native plant species that can provide resources for wildlife too. The most important factor when deciding which plant species to include is ensuring you are not planting any invasive species (see Resources). Generally speaking, the more plant species and varied plant characteristics you include, the more abundant and species-diverse the pollinator community you support will be. To provide the best long-term habitat for pollinators, focus on including perennial plant species or self seeding annuals.
Another consideration is whether you want to use plant plugs or seeds. Using plugs allows you to choose exactly where a plant goes, providing you more control and organization when installing your habitat. Additionally, because plugs have established root systems, this increases the establishment rate. Note that your plugs will be most successful when you provide them with adequate irrigation and add a light layer of mulch. Since plant plugs require this initial care and may be more expensive, you might consider starting with a small area and continuing to build out your habitat year after year. It is also helpful to contact nurseries ahead of time (see Resources) to inquire about plant species’ availability. You may need to adjust your plans based on nursery availability. With these considerations, we still recommend using plugs, and designed this document with that in mind (see photos). As an alternative, you can also install habitat using a native seed mix. Seed mixes will be cheaper than plugs and can cover a larger planting area. However, there will be less certainty over planting outcomes and likely a lower establishment rate. Consider your specific situation and what makes the most sense for you.
Table 1. Plant Species List and Characteristics
Scientific Name (Abbreviation)
Common Name
Bloom Season
Other Benefits
Asclepias tuberosa (At)
Butterfly Weed
Spring - Summer
Monarchs
Baptisia australis (Ba)
False Indigo
Spring - Summer
Nitrogen fixing
Coreopsis verticillata (Cv)
Tickseed
Summer - Fall
Drought tolerant
Eupatorium altissimum (Ea)
Tall Boneset
Summer - Fall
Nesting resource
Echinacea purpurea (Ep)
Purple Coneflower
Spring - Summer
Medicinal
Gaillardia pulchella (Gp)
Blanket Flower
Spring - Fall
Medicinal
Liatris squarrulosa (Ls)
Blazing Star
Fall
Drought tolerant
Monarda clinopodia (Mc)
Basil Bee Balm
Summer
Deer resistant
Monarda fistulosa (Mf)
Wild Bergamot
Summer
Deer resistant
Monarda punctata (Mp)
Spotted Bee Balm
Fall
Natural enemies
Pycnanthemum tenuifolium (Pt)
Mountain Mint
Summer
Nesting resource
Rudbeckia hirta (Rh)
Black-Eyed Susan
Summer
Nesting resource
Symphyotrichum grandiflorum (Sg)
Aster
Fall
Nesting resource
Solidago rugosa (Sr)
Goldenrod
Summer - Fall
Natural enemies
Vernonia glauca (Vg)
Ironweed
Fall
Drought tolerant
Step 3: Site Preparation
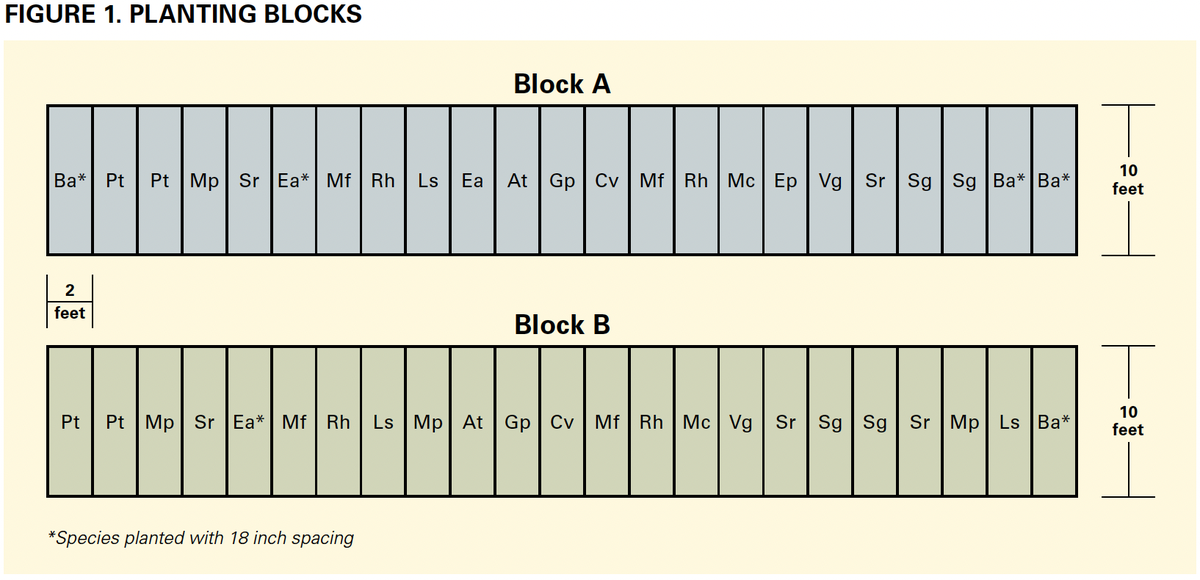
Now is the time to decide what the layout of your habitat will be. Be mindful of orientation – taller plants may shade out smaller plants if positioned in such a way that they create shade – as well as landscape features such as soil type and soil moisture. We have created a layout that you can use in Figure 1. Note that to follow our design, you must include both Block A and Block B; however, you can change the orientation of each block and repeat each block multiple times to fit the needs of your space. Think of the blocks as a modular design (Figure 2).
Before you plant anything, the MOST important action you can take is to remove turf and preexisting vegetation so that desired species can establish. There are several ways to do this, and each method has pros and cons.
Solarization: Laying thick clear plastic over the area where the habitat will go (multiple kinds of plastic can work, but greenhouse plastic may work faster). Water the area thoroughly, pull the plastic tight against the ground, and secure the edges. Leave the plastic in place for 1-2 months during the summer before you expect to plant. Solarization requires sunny, hot weather to work and will be less effective if the weather is cloudy or rainy during much of the covered period.
Smothering: Covering the area with cardboard or silage tarps to block sunlight to kill existing vegetation and prevent seeds from germinating. This can take several weeks or months.
Tillage: Inverting the soil with a bottom plow to kill and bury weeds and other vegetation deep in the soil; can be done in combination with shallow tillage with a disc followed by a silage tarp for maximum effectiveness. Note that this method does disturb the top soil so may not be ideal in some situations. Additionally, this method could turn up unwanted plants from the soil seed bank.
Manual Removal: Removing plants manually or with hand tools (more suitable for small areas).
Herbicide: Applying herbicides to unwanted plants and turf to quickly kill them. Note that chemical inputs can be harmful to wildlife and that organic farmers are prohibited from using synthetic herbicides.
We do not recommend adding any soil amendments, unless you have a specific, preexisting concern about the soil in the area where the habitat will be installed. In fact, most native plant species grow better without soil amendments.
Finally, we recommend providing irrigation, up to one year in the absence of adequate rainfall (about one inch of rain per week), to the habitat to ensure the plants successfully establish. Note that irrigation is not needed in the winter months. If you plan to install an irrigation system to achieve this, it’s best to install it prior to planting to be ready to irrigate immediately.
Step 4: Planting
Now that you have selected your planting layout and prepared your planting area, it is time to put the plants in the ground! See our planting layout for guidance (Figure 1). When using plant plugs, we recommend planting them in the ground in the fall (around late October through the end of November, depending on your location and conditions) to allow them time to establish before experiencing any winter temperature stress. If using a seed mix, we recommend waiting to put the seed out until after the last frost, but you should reference the instructions included on the specific mix you buy for more details.
When using plant plugs, it is best to lay down a layer of mulch over the area after planting. We have found this greatly increases establishment success of the plugs and greatly reduces competition from weeds or other unwanted plants.
Our layout uses 12 inch spacing in between each plant to allow for growth. However, for long-term maintenance you may consider widening this spacing to allow plant species that are known to spread more growing space. Note, though, that wider spacing may result in increased weed pressure and maintenance. You may also find it useful to mark each plant species with an ID tag until you are acquainted with what they look like and where they are.
Step 5: Maintenance
Maintaining the habitat after planting requires intentional care and can include weeding, irrigating, and re-planting species that did not successfully establish. Over the course of multiple seasons, you may see a shift in the flower species that return and you may need to replant some, depending on your goals. You should also expect to need to remove unwanted species from the habitat as well as faster growing species that may outcompete other planted species if left unchecked. Just because a plant is native, doesn’t mean it is well behaved! You should view the pollinator habitat as a living thing that will require maintenance to thrive, not something you leave unattended after installation. Adding a layer of mulch each year and mowing around the edges of the habitat can help reduce the establishment of turf and other unwanted plant species. You should also keep an eye out for periods of drought where irrigation may be needed.
Over the winter, think about how you can support wildlife with the habitat. We recommend leaving stems untrimmed until first frost, to allow birds to eat the seeds or for seeds to drop to the ground for the next season’s growth. After the first frost, we recommend trimming stems back to between 18 - 24 in. to provide nesting habitat for stem nesting insects, including bees! After you trim these senesced stems once, do not trim them again as they could have nests inside. Only trim the stems of the most recent year’s growth each year.
If you follow these recommendations, you will provide pollinators and other beneficial insects with diverse habitat, supporting ecosystem functioning.
Funding — This work was supported by the Sustainable Agriculture Research and Education program, project award no. 2023- 38640-39572 [awarded to Dr. Angel Cruz at NC State University], and in part by the Agriculture and Food Research Initiative, project award no. 2025-68016-44397 [awarded to Dr. Hannah K. Levenson at NC State University], from the U.S. Department of Agriculture’s National Institute of Food and Agriculture.
Our Team — NC State University: Hannah K. Levenson, Angel Cruz; NC Cooperative Extension: Debbie Roos; NC Botanical Garden: Daniel Stern, Rebecca Wait, Alexandra (Ali) Touloupas, Shakita Holloway, Michael Kunz; Howard Allen from Faithfull Farms; Meredith Leight from Granite Springs Farm; Millard and Connie Locklear from New Ground Farms. A special thank you to Joanna Lelekacs, members of the SCIPPM Lab at NC State University (especially Joseph Guillemette, Lucie Ciccone, Bobbie Rose, Ollie Goodman, Lauren Todd), and Bradley Metz from the NC State Apiculture Program at NC State University.